Things are not going well with my dad's health, so I canceled my flight home and will remain here in Arizona for awhile. So far I've survived the heat, but the monsoons arrived and right now I'm enjoying an amazing sound and light show of thunder and lightning. As long as there are no tornadoes, I don't mind the storms at all. (Our farm was destroyed by a tornado while we huddled in a tiny storm cellar when I was a kid.)
I've been going nuts with nothing to do with my hands, so I went to Home Depot, bought some electrical cable, sliced off the plastic covering, unraveled the copper wires inside, and now I'm practicing my wire wrapping skills on some very low-cost wire. I also found some Angelina fiber at a local store, so as soon as I can get to Tucson, I'll find a Michaels store and buy some translucent clay to play with.
So long for awhile.....
.....my journal about San Miguel de Allende, photography, travels and anything else that strikes my fancy.....
Saturday, June 28, 2008
Thursday, June 19, 2008
Greetings from Arizona
I'm spending two weeks in Arizona helping my almost 90-year-old father with some health issues. This trip was unexpected, so I never had a chance to finish posting about my Quebec trip or to show pictures of my butterfly project. All that will have to wait. I apologize to everyone who has visited the blog and found nothing new. Assuming I survive the 110 degree heat, I will be back home and posting again during the first week of July.
Friday, May 30, 2008
And now for something completely different....
 Nothing about clay this time. My DH and I are traveling for about a week through Ontario and Quebec and tonight we are staying in the lovely Sleepy Hollow Bed & Breakfast in picturesque Gananoque, ON in the heart of the 1000 Islands area. Our B&B is a gorgeous antique-filled Victorian lovingly restored by our hosts, Don and Marion Matthews. It has the most beautiful living room I have ever seen in a Victorian home, and there is a wonderful stained glass window on the staircase landing. And amidst all this original splendor, there is wireless internet service!
We sometimes hesitate to stay in B&Bs because all too often they are not that comfortable for my 6'6" husband, but this house has large rooms and high ceilings, so we are very pleased. Our room is the Tara Suite, complete with king bed and an indoor hot tub which we will probably try out later tonight, although after the terrific dinner we had, we may just sack out early. We had dinner at the Trinity House Inn, another B&B-type inn nearby. The starter of smoked duck with maple braised cabbage and apple cider brown butter sauce was delicious; both of our entrees were very good, trout for me and chicken for my husband; and the maple cinnamon creme brulee was as good as it sounds.
Tomorrow we're taking a boat tour of the islands and after that, who knows! I'll be wearing a prototype of the butterfly pin I've been working on, so I'll see if I get any comments.
Saturday, May 24, 2008
Playing with Liquid Clays
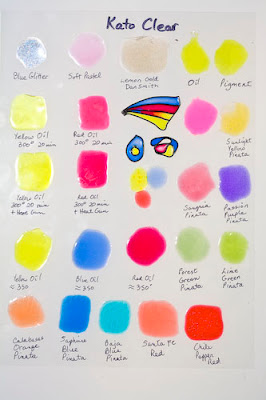

I've been experimenting with liquid clays recently, trying different brands and mixing different substances into them. I've used Translucent Liquid Sculpey (TLS) a lot, especially for "gluing" baked clay to baked clay, but it isn't as clear as I want for a project I'm working on using sort of a cloissonne effect. I'm looking for clear, vibrant colors to use for translucent butterfly wings and I want some subtle variations in colors. To figure out what to use for my project, I compared Fimo Gel with Kato Clear Medium.
Fimo Gel starts out the clearest and is wonderfully clear after baking at normal temperatures, i.e. the 265° specified on the bottle. I was disappointed with Kato Clear when baked at 275°, the temperature specified on the bottle, and even after using a heat gun on it. But then I read a paper about Kato Liquid that was handed out by Tony Aquino of Van Aken at the Synergy Conference. "When cured at 275° it will give you a flat finish. The recommended curing temperature is 300° for 20 minutes. This temperature will result in a matte finish. To increase gloss and clarity, cure an additional 10 minutes at 350° or wave a heat gun over the area until gloss is achieved." When I followed this procedure, I got a nice glossy and clear result with the Kato Medium.
I found some "artist's pigments" at a local store and tried mixing them into the liquid clays. These are "no name" pigments from China and I don't think they are ground as finely as some more expensive ones may be. I got a nice clear yellow and a bright red when mixed with both Kato and Fimo liquids, but the blues were grainy and mixing two pigments did not produce very nice secondary colors. I found that oil paints worked very well although some of them were more opaque than others. There are lots of colors and they blend very well, so I could get a nice range of hues. Pinata Inks are very translucent and some of the colors really pop, but the color range is limited. I had problems with bubbling when I baked the clay right after mixing, but letting them sit for a couple of hours until the alcohol evaporates seems to solve that problem.
When I tried making my butterfly wings (small example in the first photo), I found that the Fimo Gel was difficult to get into the tiny spaces formed by the black ribs where they come together. I used a toothpick to apply the liquid clay, and although the Kato tended to drip, it flowed very easily into the smallest spaces. The Fimo Gel wings had some problems with bubbles, although I haven't had that problem in the past when I applied the clear gel with a brush.
It turns out that all three liquid clays have their advantages and I will probably use them all for different purposes. TLS is great glue. Fimo Gel works very well as a clear sealer over mica powders and gold leaf and does not have to be baked at high temperatures, making it safe to use with translucent clay. Kato blends well, flows into small spaces and had no bubble problems, but having to bake at 350° or use a heat gun at the same temperature could cause problems in some situations.
In my next post, I'll show you my prototype butterflies. And in the future, when I can get hold of some Kato Color Liquid Clay, I will see how that compares to my homemade mixes.
Tuesday, May 20, 2008
I'm Published!
Hooray. One of my photos from Synergy was published in the current Polymer Cafe! It's on page 57.
Monday, May 12, 2008
Blog Readers
I had never heard of a blog reader until a couple of months ago, and now I can't do without one. Instead of going to each individual blog to see if there is anything new and instead of having separate RSS feeds for each one, I subscribe to my blogs through Google Reader. There are other readers out there, but this is the one I know, and it is easy to use. I can group the blogs by subject matter and it automatically tells me which ones have new posts and shows the first part of the post in a window. For short posts, I don't even have to go directly to the blog. The highlighted blogs in the image below have new posts.
 This link will take you to a tour of Google Reader. Then you can set up a free Google account, if you don't have one already, and follow instructions.
Saturday, May 10, 2008
Great Glass Bead Artist

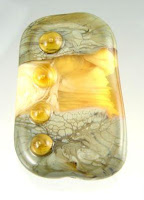
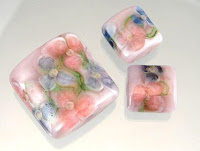
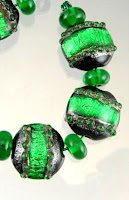
I found the most wonderful glass bead artist! OK, she's my sister, Melissa Blanton, but her beads are great. You can find her work by searching eBay for "lmg lampwork" (the lmg is for Laurel Mountain Glass). Here are some samples.



Friday, May 2, 2008
Testing Leached Premo
There has been some discussion in clay circles recently about the necessity to leach the new, softer formulation of Premo, and what, if any, effect leaching has on the strength of the clay. I decided to do a test. I took a big chunk of black Premo from a large block dated January 2008. It was quite soupy, so I'm sure it is the new formulation. I conditioned the clay by putting it through my pasta machine several times to make sure the chemicals were evenly distributed, and then I divided the clay in half. I leached one half by rolling it to #3 on my pasta machine (#1 is the thickest) and then put it between sheets of white paper. I rubbed the top sheet gently and then put a light weight on top. Then I let it sit overnight until 10 am the next morning. There was a lot of oily residue on the paper in the morning.
Next I thoroughly conditioned both the leached and unleached clay by putting it through the PM about 30 times. The leached clay cracked when I folded it and the sides were very ragged at first, but at the end of conditioning, it no longer cracked when folded.

I cut strips 1" by 5" at the #1 setting (thickest), #4 setting and #6 setting. It was easy to get a very thin strip of the leached clay, but the unleached was so sticky, it wouldn't roll flat. I got waves in it. Then I thought it would be interesting to see what would happen between the two extremes, so I blended the left over clay and made strips that were half leached and half unleached and then some that had a small amount of unleached clay added in to the leached. (3 and 1/2 parts leached and 1/2 part unleached.) This would simulate what you would do if you felt you had over-leached the clay and added some fresh clay back in. I had enough of this mixed clay to make strips at the #1 and #4 thicknesses. I baked the strips on tiles, at the same time and all at the same level in my convection oven, for 25 minutes at 285 degrees F. I wanted to be sure that the temperature met and slightly exceeded the 275 degree threshold suggested by the manufacturer. The strips were allowed to cool in the oven for several hours while I went to a movie.
First I tried bending the strips by touching one end to the other. I did that 50 times to the leached clay at all three thicknesses and they showed no wear or tear. I bent the thickest strip 50 times in the opposite direction and it was fine. That test wasn't going to show anything useful unless I spent a week doing nothing but bending clay so I tried something more extreme.
I bent about an inch of the strip back on itself and pinched the fold as tight as I could using both thumbs and forefingers. Then I bent it in the opposite direction and pinched the fold again (much tighter than in this photo). I kept doing this until the strip tore, and I tried to apply the same pressure each time. If leaching weakens the clay, I would expect to see a progression: the less leached, the more bends it would take to tear the clay.
Here's what happened:
...Leached................... 1 bend until break
...Mostly leached .....20 bends
...Half and half.......... 5
...Unleached ..............25
Second trial at #4 thickness
...Leached ..................4
...Mostly leached .....25
...Half and half .........22
...Unleached .............33
Trial at #1 thickness (the thickest)
...Leached................... 2
...Mostly leached....... 7
...Half and half .........21
...Unleached.............. 37
Clearly, at both thicknesses, the fully leached clay breaks much faster than the unleached clay when subjected to extreme bending pressure. The thickest strips showed the progression I expected, but the results for the thinner (#4 thickness) strips was strange. The clay that was 3.5 parts leached to .5 parts unleached performed better than the clay that was half and half. I can't explain that. I mixed the clay thoroughly before making the strips. Perhaps the pressure I applied wasn't uniform.
For the very thinnest strips (#6), the leached clay broke after 14 bends and the unleached was still fine after 45 bends. No cracking at all. I didn't have intermediate samples at this thickness.
This bending test subjected the clay to stresses that probably would not be found in real life, so I tried whacking the different strips against the edge of my desk to simulate what might happen during shipping or if an item was dropped. None of them broke or chipped. Tests of objects with different shapes would be necessary to see what might happen during shipping of a sculpture, for example.
So, what does this tell us? Well, leaching makes Premo less able to withstand flexing, i.e., it is more brittle. For something like a cuff bracelet, less leaching is better. But for other objects not likely to be subject to such stresses, leaching may be acceptable. The question remains, how much is OK for a particular application and how do you control the amount of leaching that takes place? Is there a critical point where it goes from acceptable to not acceptable and how do you know where that is?
Next I thoroughly conditioned both the leached and unleached clay by putting it through the PM about 30 times. The leached clay cracked when I folded it and the sides were very ragged at first, but at the end of conditioning, it no longer cracked when folded.

I cut strips 1" by 5" at the #1 setting (thickest), #4 setting and #6 setting. It was easy to get a very thin strip of the leached clay, but the unleached was so sticky, it wouldn't roll flat. I got waves in it. Then I thought it would be interesting to see what would happen between the two extremes, so I blended the left over clay and made strips that were half leached and half unleached and then some that had a small amount of unleached clay added in to the leached. (3 and 1/2 parts leached and 1/2 part unleached.) This would simulate what you would do if you felt you had over-leached the clay and added some fresh clay back in. I had enough of this mixed clay to make strips at the #1 and #4 thicknesses. I baked the strips on tiles, at the same time and all at the same level in my convection oven, for 25 minutes at 285 degrees F. I wanted to be sure that the temperature met and slightly exceeded the 275 degree threshold suggested by the manufacturer. The strips were allowed to cool in the oven for several hours while I went to a movie.

First I tried bending the strips by touching one end to the other. I did that 50 times to the leached clay at all three thicknesses and they showed no wear or tear. I bent the thickest strip 50 times in the opposite direction and it was fine. That test wasn't going to show anything useful unless I spent a week doing nothing but bending clay so I tried something more extreme.
I bent about an inch of the strip back on itself and pinched the
 fold as tight as I could using both thumbs and forefingers. Then I bent it in the opposite direction and pinched the fold again (much tighter than in this photo). I kept doing this until the strip tore, and I tried to apply the same pressure each time. If leaching weakens the clay, I would expect to see a progression: the less leached, the more bends it would take to tear the clay.
Here's what happened:
Number of bends until the strip tore all the way across
First trial at #4 thickness...Leached................... 1 bend until break
...Mostly leached .....20 bends
...Half and half.......... 5
...Unleached ..............25
Second trial at #4 thickness
...Leached ..................4
...Mostly leached .....25
...Half and half .........22
...Unleached .............33
Trial at #1 thickness (the thickest)
...Leached................... 2
...Mostly leached....... 7
...Half and half .........21
...Unleached.............. 37
Clearly, at both thicknesses, the fully leached clay breaks much faster than the unleached clay when subjected to extreme bending pressure. The thickest strips showed the progression I expected, but the results for the thinner (#4 thickness) strips was strange. The clay that was 3.5 parts leached to .5 parts unleached performed better than the clay that was half and half. I can't explain that. I mixed the clay thoroughly before making the strips. Perhaps the pressure I applied wasn't uniform.
For the very thinnest strips (#6), the leached clay broke after 14 bends and the unleached was still fine after 45 bends. No cracking at all. I didn't have intermediate samples at this thickness.
This bending test subjected the clay to stresses that probably would not be found in real life, so I tried whacking the different strips against the edge of my desk to simulate what might happen during shipping or if an item was dropped. None of them broke or chipped. Tests of objects with different shapes would be necessary to see what might happen during shipping of a sculpture, for example.
So, what does this tell us? Well, leaching makes Premo less able to withstand flexing, i.e., it is more brittle. For something like a cuff bracelet, less leaching is better. But for other objects not likely to be subject to such stresses, leaching may be acceptable. The question remains, how much is OK for a particular application and how do you control the amount of leaching that takes place? Is there a critical point where it goes from acceptable to not acceptable and how do you know where that is?
Wednesday, April 30, 2008
Such a busy weekend
The clay room at Morrisburg

I'm still recovering from a fun weekend at Morrisburg, Ontario. It was the annual retreat for the Clayamies of Ontario and Quebec, and we had a good, but tiring, time. As usual, members gave interesting classes and demos, and I think everyone learned a lot. Just being in a room with a lot of dedicated clayers and seeing their remarkable work was inspiring and made the trip worthwhile. The clay room was open 24 hours per day and at least some members made good use of the time.
This year we started off by going around the room and telling secrets about ourselves, an ice breaker that led to a lot of good stories at Happy Hour. For a small fee, I will repeat some of them....
We did have an unfortunate drama, however. One of our members was rushed to the hospital at 3am with life-threatening heart problems, but she seems to be improving. We all wish Christine a fast recovery.
Wednesday, April 16, 2008
My first, um, .....

I call it Reef Dreams, but I'm not sure what it is - a sculpture, a miniature, a cute knick-knack? It is about 5 and 1/2 inches across and about 4 inches tall, so it's larger than dollhouse scale. The image just popped into my head and I felt compelled to make it. Now the question is: would anyone buy this? Apparently people buy little scenes with fairies and dragons or mermaids. Scuba divers would like it, I think.


Everything, including the large shell the scene sits on, is made of clay except for the string of "pearls", the jewels on the crown, and a few beads in the chest. If I make any more, I would probably try to make everything out of clay.
(For those who don't scuba dive or snorkel: the purple thing is an anemone with a clown fish peeking out of the tendrils. It is poisonous, but the clown fish is immune. The tall, thin lavender thing is a sea fan. The green ball that looks like a brain is Brain Coral. The tall red thing is a sponge and so is the yellow thing behind the sea fan. You really do see those bright colors underwater.)
What do you think?


Thursday, April 10, 2008
Workshop Quirks

This is the sight that confronted me as I approached my workshop this morning. You see, I'm just renting my house and there is wall-to-wall carpet everywhere. I can't afford to muck it up by tracking clay around, so I put down some make-shift floor covers in the studio and I keep one pair of shoes to wear in there. I kick off whatever shoes I'm wearing, go into the room, put on the "studio" shoes and go about my business. When I leave the room, I reverse the procedure. It's a pain in the you-know-what, but it will keep the landlord from suing me for damages. Sometimes when I leave the studio, I don't bother putting the original shoes back on, and then later, end up wearing ANOTHER pair of shoes to be deposited by the door. I decided they were a tripping hazard and put them all back where they belong.....at least, for a little while.
Sunday, April 6, 2008
Cane Slicing
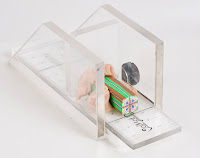 I'm pretty good at "eye-balling" measurements, but I wanted to be even more exact for slicing canes. Anything to lessen sanding requirements, right? I've tried different cane slicers, but none have given me the precision and uniformity I desire. The Precise-a-Slice from ValKat Designs worked the best for me, but I was still having problems. The stiffer blades are thicker and had a tendency to mash down the cane and make marks on the slices, while tissue blades are so flexible, I kept getting curved slices of varying thickness. My hands couldn't hold the tissue blade rigidly enough. Then this morning I had a brain storm - my jewelry saw might hold the blade! Sure enough, it did, and it worked especially well when I cut the blade to the shortest length possible. For paper thin slices of canes with translucent sections, I'll probably still hold the cane and blade in my hands, but so far, this method is working very well. (The Precise-a-Slice is available at Polymer Clay Express. Scroll down the equipment page to find it.)
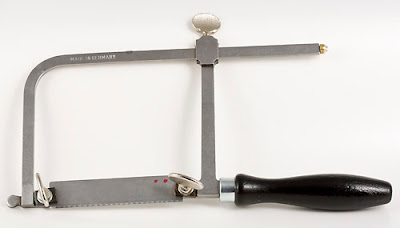
Here's how I did it. I used tin shears to cut a tissue blade to a length of 3 1/4 inches. It was very easy to cut, but be sure to wear eye protection! Then I put the blade in my adjustable jewelry saw, making it as taut as possible. Again, be careful doing this because the cutting edge of the blade will be up while you are pushing against the saw to tighten it.
I centered the cane in the Precise-a-Slice and stabilized it with some Super Sculpey (putting some on top of the cane, at the back, keeps it from rising when you slice), and then I sliced by holding the saw so that the blade was against the guides and angled slightly. So far, I've had good luck slicing at the thinnest increments marked on the device.

Saturday, April 5, 2008
Another vessel
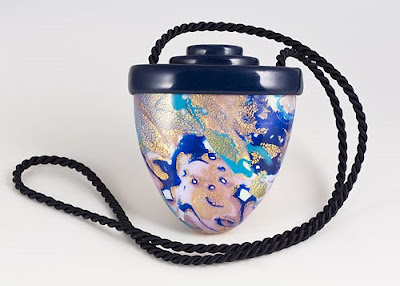
Here is a second vessel from Seth Savarick's class. I'm quite pleased with it. The top and cord are navy blue, which is the same dark blue in the mokume gane. It just looks a lot lighter in the mokume gane.
I'm glad I'm not the only one feeling some creative malaise lately, probably as a result of a much too long winter. Libzoid has been feeling the same way. If you check out her blog, you can take a peek at the studios of different clay artists. She features a new one each week.
Thursday, March 20, 2008
Oh NO!!
My shells below:
 I returned from scuba diving in the Caribbean a couple of months ago with some shells and a sand dollar and immediately made molds of them. My sand dollar isn't perfect, so I need to do some more work to make the mold the way I want it. I finished some small shell earrings (center in photo)and experimented with different coloring for the big shell. I put a ring in the white one so I can string it. In addition to my plans for making some simple earrings and necklaces, I also made some faux black coral and I was planning to make a starfish and some other creatures, like sea fans or sea urchins, and then combine a bunch of the pieces into an elaborate necklace. I just have some preliminary sketches of that. But I checked out Tina's Etsy site today and she has some nice starfish and fish items and Just Jewelry showed sterling silver sea fans on the 18th. I was going to try making them with liquid clay....
I know all the discussion of what constitutes copying is having a distressing effect on me as I struggle to "find my own voice" and I hope it is not causing anyone to forego pursuing their ideas.
Thursday, March 13, 2008
My First Vessel


TA DA! Here it is:
my first vessel ever. This is one of the three I started in Seth Savarick's class. Not bad for my first mokume gane and first attempt at a vessel, but I know I can do better. It should have a cord attached to make it wearable, but I don't think I will bother. The turquoise clay had some plaque that I didn't notice until it was baked. And I don't care for the TLS surface over the mokume gane. It is still too cloudy for my taste even though I used a heat gun on it. My TLS is old and a bit thick, so I don't think the coats I applied were thin enough. I'll try the Fimo Gel on a future project. It came out much clearer in my tests.
Sunday, March 9, 2008
Where to Begin???
I'm back home after three weeks away and trying to figure out where to start. Paying bills, of course. Unpacking my goodies from Synergy. I have new toys to play with - some "Pro" bead rollers, faux bone (no idea what to do with that yet), new mold/mould making materials (don't know whether to use American or Canadian spelling), my "Mona-fied" pasta machine, and some new videos and DVDs. I'm full of inspiration but trepidation too.
I consider myself to be an intermediate clayer: definitely not a beginner, but still learning and searching for my "voice." I was already concerned about how to use all the techniques I'm learning without imitating other people's work, and the discussions at Synergy and in recent posts on clay bulletin boards only reinforced those concerns. I tend to paralyze myself. If I can't do something totally unique and original, then I can't do anything at all. Which is a bit too much to expect from someone who is still learning. I'm sure I'm not the only one struggling with these issues.
So, my first project is to finish the vessels I started at Seth Savarick's class. Stay tuned.
And best wishes to Ponsawan, my Synergy roommate, and her daughter.
Tuesday, February 26, 2008
Beyond the Blend
 My marathon week of claying finally came to an end and I am recovering at my mom's house in Pennsylvania. I darted out of the Synergy gala dinner just before the live auction, which I heard was a lot of fun, and drove back to Damascus, Maryland to get ready for Dan Cormier and Tracy Holmes' two-day workshop called Beyond the Blend. Dan is a very analytical and precise kind of guy and he has spent much of the last two years working with clay blends in the pasta machine. He has come up with an interesting method for achieving complex, predictable and repeatable results. He also likes developing tools and introduced the SHARK, a device for limiting the spread of clay in pasta machines. It helps when you want to make a narrow blend or just a narrow strip of clay. Griffin Cormier was there as well, running around in his jammies, and he kept us all entertained.
I can't say enough about Rob and Wilma and Devon at Artway Studio/Polymer Clay Express. They gave the students the run of the store and instantly provided anything we needed for the class.
I'll be offline for awhile. I'm driving my mom down to North Carolina for a big family reunion and probably won't be blogging til I get back to Canada around March 8. Unless, of course, you want me to show photos from my cousin's 50th wedding anniversary.
Saturday, February 23, 2008
Synergy, Day Three
 My first seminar of the day was Christi Friesen's Art Jewelry Designing. She gave each attendee a pen and a little booklet called "doodle your way to amazing wonderfulness or: how to design art jewelry without hardly trying," and encouraged us to scribble and doodle everywhere we go, even in her lecture. She showed how her inspirations lead to doodles and then to more detailed designs for her elaborate jewelry, although she said her finished pieces often vary quite a bit from her sketches. Then she told us her techniques for assembling her unusual shapes.
 Jana Roberts Benzon gave a very detailed demonstration on how to construct her breathtaking dimensional caned pieces and showed how dimension catches light, creates shadow, and results in interest and intrigue. To make it easy for everyone in the room to see what she was doing, she had a video camera pointed at her work surface and sent the image through a projector onto a big screen. I also liked her outfit and the little elf condoms she was wearing on her fingers.
During the afternoon gathering, Tim McCreight got 200 grownups to play with little pieces of paper. His interactive presentation was called


 Design Decisions: Good, Better, Best, and he started out by challenging us to improve upon a design he put on an easel. Seth Savarick and Donna Kato were forced to do this in front of everyone. Then the people at each table arranged their pieces of paper and talked about their design decisions. Fun.
My last seminar of the conference was Karen Woods "Unconventional Polymer." I was feeling a little sleepy but Karen's amazingly energetic presentation woke me up and k
 ept me fascinated all the way through. She had so much information to share that she talked a mile a minute and ended up quite out of breath. She showed us real items borrowed from other artists and lots of pictures of unusual and different ways of using polymer clay. In addition to looking outside the clay world for inspiration, she told us to "take a class in something you don't want to do," such as basket weaving or mosaic tiling or some other skill that might possibly suggest a use in clay.
Kudos to all the people who put Synergy together. It was a wonderful experience for me, and everyone else I talked to seemed very pleased as well.
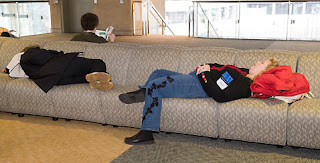
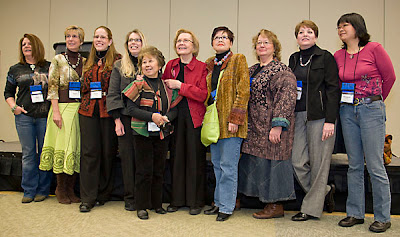
Synergy participants at the end of Day 3

Friday, February 22, 2008
Synergy, Day Two

Miss Carol Duvall got the day off to a rousing start with her keynote speech, Television, Polymer Clay and Me. Her tales of the early days of her career were hilarious, and her description of the craft items that didn't make it onto the air (think of cute things made of feminine hygiene products!) were priceless. The whole thing turned into a love fest with members of the audience thanking Carol for her contributions to crafting in general but especially for introducing polymer clay to the public. Many in the audience first heard of polymer clay through Carol. At the end of the speech, all of the artists who appeared on her show gathered for a group photo.
Next the Vendor Fair opened: so many goodies and too little money to spend. Kato Polyclay introduced their new colored liquid clay; Alumilite Corp introduced their new Amazing Mold Putty and Amazing Casting Resin; Robert Dancik introduced Faux Bone; and there were lots of books, videos, tools, Art Clay Silver, and of course, polymer clay for sale.
 An afternoon panel discussion chaired by Jeffrey Dever tackled the tough topic of "Inspiration, Originality and Infringement." Is imitation really the sincerest form of flattery? The consensus seemed to be: in order to learn, you must first imitate, but you don't have to sell it! Take the time to develop your own voice, your own style. Use techniques, not someone else's design. The panelists were Elise Winters, Thomas Mann and Dan Cormier.
 My afternoon seminar was about the Juried Craft Show Circuit. Louise Fischer Cozzi gave us helpful information about applying to shows, what kind of photography we need, what is required in a booth - lighting, signage, displays, flooring, etc. I didn't know you had to pay extra for electricity!
 Later in the day there was time for vendors to give demonstrations. Melanie West showed us how to cover her cuff bracelet blanks with clay.
Finally, after grabbing a quick sandwich, it was time to learn how to blog! Cynthia Tinapple (center in photo) of Polymer Clay Daily led the presentation assisted by Alison Lee of Craftcast (left) and Susan Lomuto of Polymer Clay Notes. I think I still have a bit to learn.
Thursday, February 21, 2008
I'm not worthy!

The Gallery
Oos and Ahs filled the room when the Artists' Gallery opened at Synergy today. After looking at so much of this work in books and online, it was a delight to finally see it in person. After a few minutes, though, I suddenly felt overwhelmed by the beauty and craftsmanship I was seeing and blurted out, "I'm not worthy." Based on the hearty laughter that followed, I wasn't the only one feeling this way.

My day got off to an early start with Lindly Haunani's seminar on Eccentric Bead Shapes. Actually, I think Lindly is more eccentric than her beads, and she was lots of fun.
Next Judy Belcher and Maggie Maggio welcomed us and Kathleen Dustin spoke about the history of polymer clay.

 Jeffrey Dever chaired a panel Discussion on Hallmarks of Craftsmanship with Donna Kato, Rachel Carren, Sarah Shriver, and Alison Lee.

Nan Roche gave a seminar on Fine Finishing and demonstrated proper methods of sanding, drilling and buffing. She also talked about the chemistry of polymer clay and explained why it behaves the way it does and how knowing about the chemistry helps us handle the medium properly.
My long day ended with Kathleen Dustin's seminar on earring design. Her ideas for making earwires an integral part of the earring design were very helpful.
Subscribe to:
Posts (Atom)


